Configuring Notification Settings
Notifications allow ChangeGear to send updates to users via email or Short Message Service (SMS). When configured, ChangeGear can notify users when an action occurs such as when a ticket is created, updated, or closed.
Configuring Email Notifications
When email notifications are enabled, ChangeGear uses either the Simple Mail Transfer Protocol (SMTP) protocols or Exchange Web Services (EWS) to send alerts to the selected recipients.
Note: If you use EWS to send alerts, make sure the OAuth configuration is set up. See Exchange Access using OAuth 2.0 for more information.
The target email address is determined by the Email field in the user's profile. If the user does not have an email set, then no notifications are sent.
To configure email notification settings:
-
Click the Administration tab.
-
Under the Platform node, click Global Settings.
-
Click Notification.
-
Click the Enable slider to enable the notifications.
-
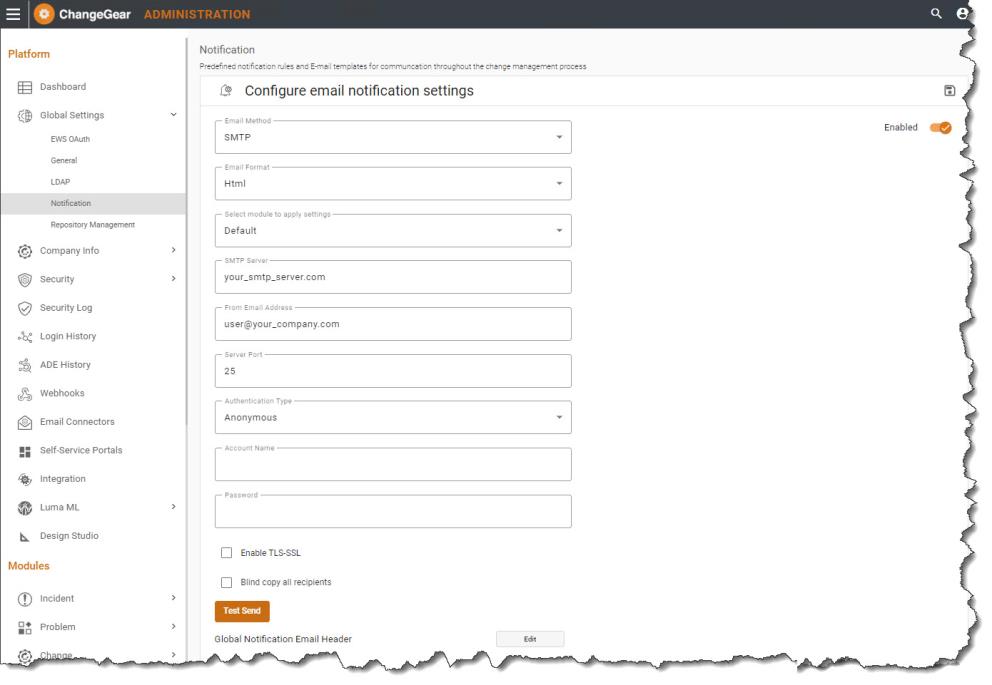
Select the Email Method that you want to use. The configuration steps will vary depending on your selected method.
If you selected SMTP, perform the following actions:
-
Select a module to apply your changes to. You can specify a different account for each module. If you want your settings to apply to all modules instead of one specific module, keep Default selected.
-
Enter the address of your SMTP server in the SMTP Server field.
-
Enter the Server Port. The default is 25.
-
Specify the email address that will appear in the notifications in the From Email Address field. This lets you specify the address that appears in the From field when an email is sent.
Note: You can only use addresses that are linked to the email account specified in the Authentication section.
-
For security purposes, check the Enable TLS/SSL checkbox if your SMTP server uses TLS or SSL. You may need to change the Server Port if your SMTP server uses a different port for TLS or SSL.
Important: SSL over port 465 is currently unsupported.
-
Select the Authentication Type required by your SMTP server.
Enter your Account Name and Password if required.
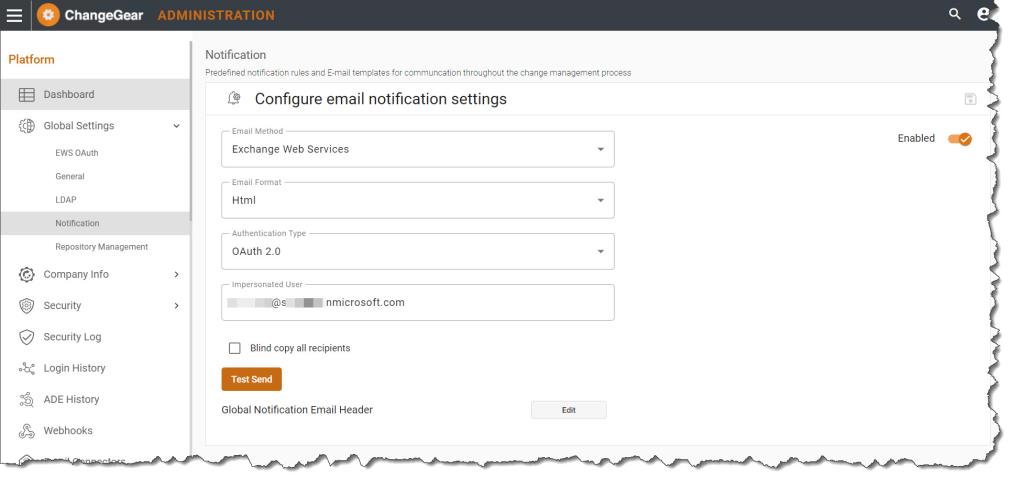
If you selected Exchange Web Services, perform the following actions:
In the Authentication Type drop-down, select OAuth 2.0 (Basic Authentication was deprecated by Microsoft).
Enter the Impersonated User information.
Note: Impersonated User is the email address of the mailbox EWS uses to process emails.
-
Select Blind copy all recipients if you do not want your recipients to see who else is receiving the email notification. This applies to emails that are sent to multiple recipients.
-
Select an Email Format. HTML allows you to send formatted messages, while Text sends plain text messages.
-
Click the Test Send button to verify your configuration settings. A pop-up window will ask for an email address. Enter an email address to send a test message to and click OK to send the message. ChangeGear displays a dialog if the email is sent successfully or if an error occurs.
-
After verifying that the message was sent successfully, click Save.
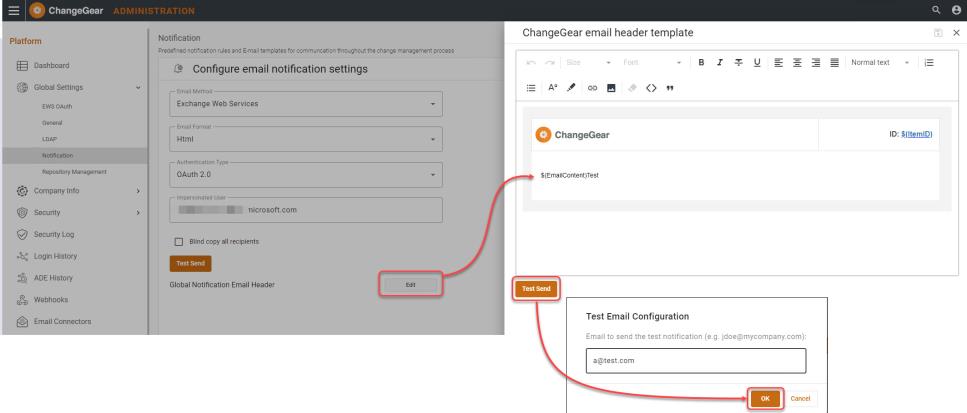
Configuring a Global Email Notification Header
The Global Notification Email Header section allows you to set a master header for all email templates. Using the header template, you can apply a custom style to all email templates without having to individually modify each template.
As with all templates, the header template supports the use of fields. The following fields are present in the default template:
-
$(ItemID) displays the ID of the email's subject (for instance, the ticket ID). By default, this also provides a clickable link that opens the item in the recipient's Web browser.
-
$(EmailContent) displays the contents of the child template (the template that the header template is currently being applied to).
To configure the global email notification header:
-
In the Notification Settings section of the Global Settings screen, click the Edit button next to Global Notification Email Header.
-
Enter the contents of your template. Make sure that the body of your message contains the $(EmailContent) field.
-
To test your template, click the Test Send button and enter an email address, then click OK to send.
-
In the Connection Succeeded dialog, click OK.
-
Click the Save
 icon to save the template, then click the X to close.